Photo Credit: Doug Schneider Photography
Food photography is an incredible art. In my time at Bon Appétit, this became even clearer. While amazing recipes are at the core of the publication, the art direction and photography draw people in to try them. They are so incredibly skilled at what they do over there and it definitely inspired me to take things to the next level for you here.
I started this blog based on a desire to share my journey managing food allergies and celiac while still maintaining a passion for food. I never knew anything about photography before I began developing and sharing recipes. My first pictures were actually taken on my iPhone with very little consideration for lighting or other important factors.
As I began to read other blogs, I found, not surprisingly, what drew me in most was the food photography and styling. Ultimately, I bought a great camera but, to be honest, I still don’t really know too much about how to use it. However, I now try to take all of my pictures outside in order to utilize natural light. I feel it has really made a difference in my photos yet; there is still so much to learn.
I was thrilled when Doug Schneider recently approached me about working together. I’ve admired Doug’s photography on his wife, Sara’s blog, as well as a lot of other great work he has done. These cookies are delicious and Doug’s photos definitely show it! It was great to work with him and I hope to learn skills which will help improve my own photography. In the meantime, we may be lucky enough to see some more of Doug’s photos pop up here from time to time.
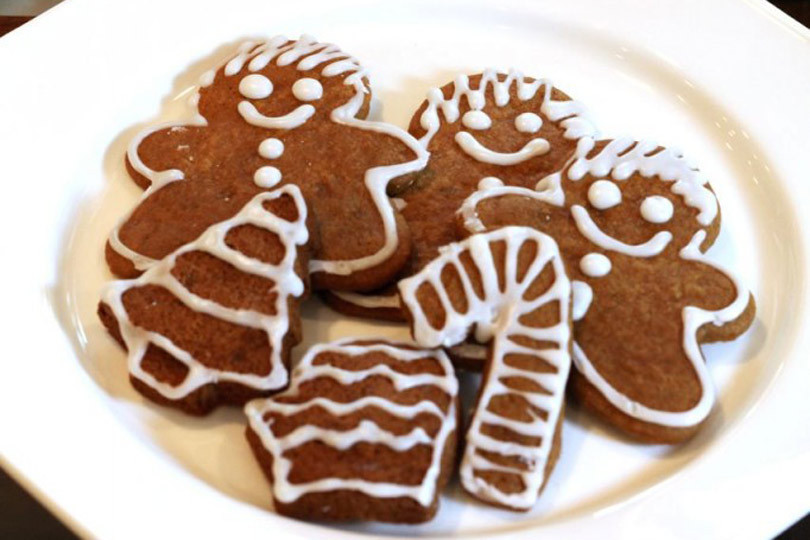
I wanted to make cutout cookies for the holidays. I love the spice in these and brown butter really adds richness in flavor. Santa will definitely approve!
")
Brown Butter and Molasses Cookies via @JackieOurman
Photo Credit: Doug Schneider Photography
- COOKIES:
- ½ cup (1 stick) unsalted butter
- ½ cup brown sugar
- ¼ cup granulated sugar
- 1 egg
- 1 tsp vanilla
- 1½ cups, gluten-free flour blend*
- 1 tsp baking soda
- ½ tsp cinnamon
- ½ tsp kosher salt
- ¼ tsp ginger
- 2 Tbl molasses
- ICING (Optional):
- 2 cups confectioners sugar
- 2-3 Tbl milk
- 1 tsp vanilla
- Brown butter in a small sauce pot over medium heat, stirring constantly until milk solids start to separate, turn golden brown and fall to the bottom of the pot (about 4-6 mins)
- Immediately scrape out of pot into a large bowl and refrigerate until fully cooled (about 1-2 hours)
- Whisk flour, baking soda, salt, cinnamon and ginger together in a medium bowl and set aside
- Add sugars into bowl with the cooled brown butter and using a hand-held mixer, beat together. Start on medium and go up to high once fully incorporated and beat until light and fluffy (about 7-10 mins)
- Beat in egg and vanilla and scrape the sides, if needed
- Slowly add in the flour and mix on medium speed until just incorporated before adding the molasses. Continue to mix on medium speed about 1-2 minutes.
- Scrape the dough onto a large piece of plastic wrap, form into a disk about 1" thick and refrigerate until firm, about 2 hours.
- Remove dough from refrigerator and heat oven to 350 degrees. You can either drop dough by 1 tablespoon rounds onto parchment paper, about 2" apart and bake them as regular cookies or roll out the dough onto a surface sprinkled with gluten-free flour and make cutout cookies.
- If you make drop cookies, I recommend sprinkling them with brown turbinado sugar before baking.
- To make cutout cookies: roll the dough on a surface sprinkled with gluten-free flour until about ¼" thick and cut into whatever shapes you like. Once cut, you should refrigerate the shapes, on parchment, about 2" apart for 10 minutes, until slightly firm, before baking. This will allow them to keep better hold their shape.
- Bake cookies about 10-12 minutes or until lightly browned at edges.
- ICING:
- Place confectioners sugar in a small bowl and whisk in milk, 1 tablespoon at a time, until you reach your desired consistency. Add in vanilla and transfer to a piping bag with whatever attachment you would like to use to decorate your cookies (I just cut a small hole in the bottom of my plastic piping bag to line these cookies).
- Serve (or place next to the fireplace for Santa) and enjoy!


This is a comment to the webmaster. I discovered your page via Yahoo but it was hard to find as you were not on the front page of search results. I know you could have more visitors to your website. I have found a website which offers to dramatically improve your website rankings and traffic to your website: http://garye.co/8k I managed to get close to 1000 visitors/day using their services, you could also get a lot more targeted visitors from Google than you have now. Their service brought significantly more visitors to my site. I hope this helps!